Steps for Doing Live Samagam
1. Basic Requisites
2.
Step by step guide for live video feed using Flash Encoder
3.
Step by step guide for doing live on Youtube Server
4.
Step by step guide for doing live using Elgato Game Capture HD Encoder on both Youtube and SNM Server
(Preferred Option)
Please note: If you want to do live on youtube please go to #3 link first then come to #4 link. (MOST IMPORTANT)
5. Troubleshooting Tips
1) Enough Internet Bandwidth of the upload speed of
your Internet connection to cover the bit rate or bit rates you wish to
broadcast the live event.
- You need to add all of the rates you are going to
stream together and calculate the total upload speed (bandwidth) required
for the program
- Make sure that the total does not go over about 80%
of your maximum upload speed (bandwidth) of your connection
- For a Single Upload Stream, an upload bandwidth of at
least 512 kbps is preferred.
- PLEASE DO NOT ATTEMPT LIVE TELECAST
FROM 128kbps LINE upload speed. If you have a high download speed it does
not mean you have high upload speed.
- Use online services to check your
upload speed
http://www.speakeasy.net/speedtest/
- Do not trust the advertised bandwidth from ISP.
Avoid using wireless data cards for live broadcast.
2) Appropriate Laptop/Desktop with enough CPU & RAM
along with Audio Video Input and Capture Capabilities.
- Use of a Laptop is preferred to avoid disconnection
issues at the Venue due to Power Fluctuation or Failure.
- For good Video Encoding, the Laptop should have at
least a Core2Duo CPU with at least 2.4 GHz CPU
- At least 8 GB of Memory (RAM) is required for smooth
functioning for the Broadcast.
- Always keep in mind that the total
CPU Usage while broadcasting should not cross 80% CPU Usage (Task Manager)
to avoid quality & connection loss.
- A Firewire Port on the Laptop (for direct firewire AV
broadcast) or a USB based AV Capture Device (example: Pinnacle Dazzle Box).
- It is highly recomended that please do not use the pc/laptop when encoding Live video feed and should not open any other programme except Flash Media Live Encoder.
3) Software Required - Encoding Software
- SNM Server allows for following options: Flash Encoder
- At this point Flash Encoder is the
preferred option and windows encoder is not being used
4) Audio Video Hardware Requirements
- Camcorder with a Fire wire or Thunderbolt output port. (Camcorders
with USB output have shown incompatibilities when trying to broadcast so
avoid USB Camcorder for Live).
- Flash Media Live Encoder accpet only RAW formate
audio and video (e.g. AV input )
- Direct audio output from Amplifier or Mixer (This
direct audio output from amplifier can be connected to Laptop/PC directly or
to a Camcorder with a "mic" input. Avoid using camcorder to directly
pick audio from the hall as that picks lot of noise.)
- Use a SINGLE Hardware for both (Audio & Video) to
avoid Audio Video Sync Issues.
- When trying to upload Multiple Audio Video Feeds, use
separate Laptops and separate Audio Video hardware.
Options For Connecting Camcorder/Video Source To Computer
Wrecommend getting the signal into a computer by using either Thunderbolt, PCIe
or if you are transferring SD video Firewire. These three connections seem to
provide the most stability. When choosing a capture device please make sure it
has the appropriate connections for both your camera output and your computer
input.
Also read
- Video Camera with Firewire Output
- If your video camera has a firewire output then look for Laptop with
Firefire input
- Firewire shall carry both audio and video and shall be easiest way to
connect both of them
- Video Camera with HDMI Output
- Typically laptops have HDMI output but do not have HDMI input. So you
need to take HDMI output from camera and provide it to Thunderbolt or USB
Input of your laptop
- If using Mac then good option
-
Blackmagic Design UltraStudio Mini Recorder ($139) - Takes HDMI
input and provides Thunderbolt output to be added to your macbook
-
Thunderbolt started to come in Mac from 2011 onwards and so check
this link to
confirm if your macbook has thunderbolt port or not
- If using Windows laptop
- If you do not have a HD video camera with HDMI or Firewire outputs you
can look to rent same from
http://borrowlenses.com.
- Multi Shoot Video camera are generally connected to Video mixer which is
connected to Sony Professional HVRM25U HDV Record/Playback Deck which
provides firewire output that can be then hooked to Laptop.
Other Useful Tips
- Please make sure to do test run with amplifiers and
equipments at least 4-5 days in advance.
- Majority of times issues in live broadcast are
related to compatibility of camcorder and laptop and encoder. You can just
plan any video cassette on your camcorder and archive to file in windows
media encoder to ensure there are no compatibility issues of hardware.
- Global broadcast email and links on Main site would
be added only after confirmation of successful test run.
- Plan to start the live broadcast at least 30 minutes
before the scheduled start time. Lot of time when you start live broadcast
there are issues to identify appropriate encoding speed and it is
appropriate to sort those out before the start of event.
- Always advisable to have two laptops ready and tested
with encoder so that in an unlikely event of one laptop crash/issues, other
laptop can be used.
- Do not save/archive video to disk from the laptop
which is being used for streaming to avoid issues in streaming.
- Use one laptop for streaming and use another laptop
to watch the event. From second laptop also have connectivity of instant
messenger and stay connected with SNM Webmaster and any other users in order
to seek feedback around quality of broadcast.
- Please make sure to install latest patches as may be
available for Encoder
- Avoid using Wifi if possible specially from laptop
being used for Live broadcast.
- Please download
Adobe Flash Media Live Encoder, which is a free software for doing live flash
broadcast.Input the URL and stream name as provided by the Technical teamssStep 1:
Download, install, and launch Flash Media Encoder
Step 2:
Stream your audio and/or video source to the server
Step 3:
Use the Live page play the live stream on your web page(s)
-
Download and install these softwares -
- Click here to download and install Adobe Flash Media Live Encoder 3.2
-
Click here to download MainConcept AAC Audio Encoder plugin.
 |
| |
 |
|
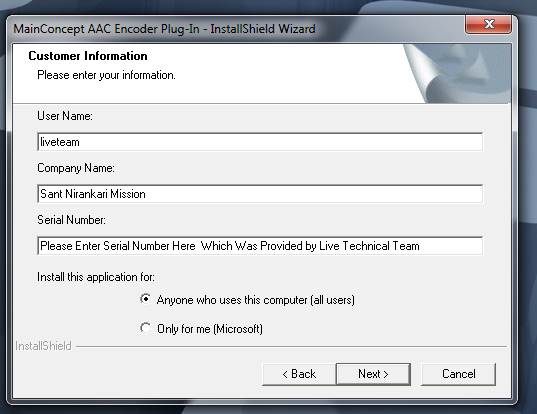
Please enter the details as given in left side image. For example -
User Name: liveteam
Company Name: Sant Nirankari Mission
Serial Number: Please enter serial number here which was provided by the technical team
After successfully instalation it is recommended that please restart your PC/Laptop. |
| |
 |
|
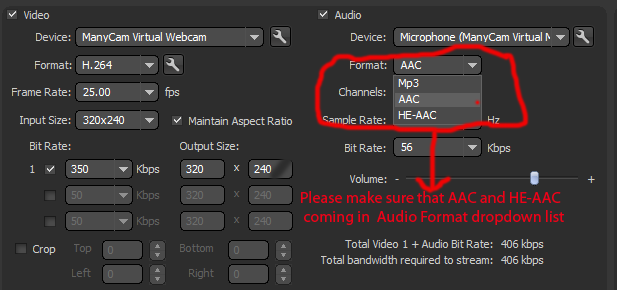
After successfully installation of Adobe Flash Media Live Encoder and MainConcept AAC Audio Encoder Plugin, please launch Addobe Flash Media Live Encoder and select the Audio video source camera and check the Audio Format dropdown list to verify that if AAC and HE-AAC showing or not. If it is not showing then you have to reinstall MainConcept AAC Audio Encoder with all necessary details and restart PC/Laptop anc check it is working or not.
User Name: liveteam
Company Name: Sant Nirankari Mission
Serial Number: Please enter serial number here which was provided by the technical team |
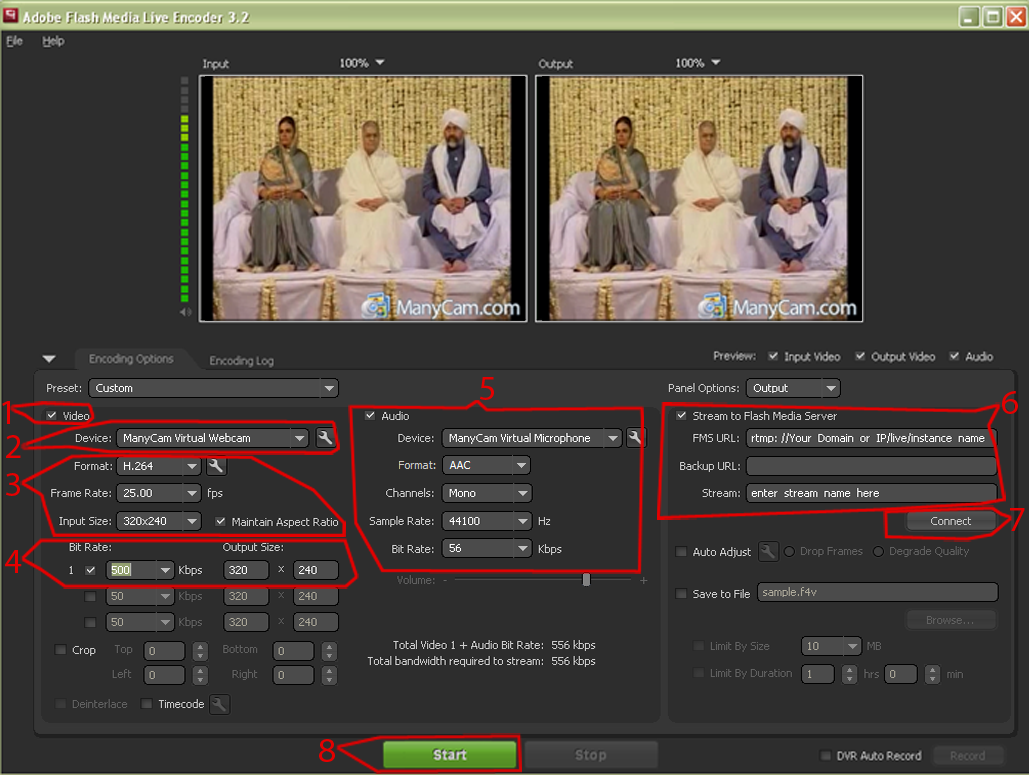
Selecte the videoFormat: H.264, Frame Rate: 25.00, Input Size: 320 x 240 . Input Size may be different for different camera's so please select appropriate.
To start streaming your video and/or audio source, please follow these
steps:
- Select the 'Video' option to enable video
streaming (see screenshot below). Select the 'Audio'
option if you want to stream live audio.
- Select the video source you would like to stream under the 'Device'
parameter.
- Selecte the videoFormat: H.264, Frame Rate: 25.00, Input Size: 320 x 240 . Input Size may be different for different camera's so please select appropriate size and check the maintain aspect ratio.
- Select the bitrate 200 ( default bitrate) and output size 320 x 240.
- Selecte the Audio of same camera which you selected for Video source and Format:
AAC , Channel: Stereo , Sample Rate: 44100 Hz, Bitrate:
128 Kbps
- Enter the following address for 'FMS URL': (as
provided by the technical team)
rtmp: //Your_Domain_or_IP/live/instance_name
Replace Your_Domain_or_IP with your domain name or
dedicated IP address (if your account has been assigned one).
When entering your domain name, do not
enter the 'www.' portion (e.g. type in mysite.com
and not www.mysite.com).
The instance name is arbitrary and is used to reference the stream.
Example FMS URL: rtmp://mysite.com/live/soccermatch.
Choose a name for your live stream and enter it in the 'Stream'
field. Stream name is arbitrary and could be called anything.
- Click on 'Connect' to connect to the server. If
Flash Media Encoder is unable to connect to the server, please check
your 'FMS URL' address.
- Click on the big green 'Start' button near the
bottom of the page to start streaming your video and/or audio source
to your account.
Please check the above points in below screen shot image: - First and default single stream 200 Kbps ( total 256 Kbps)
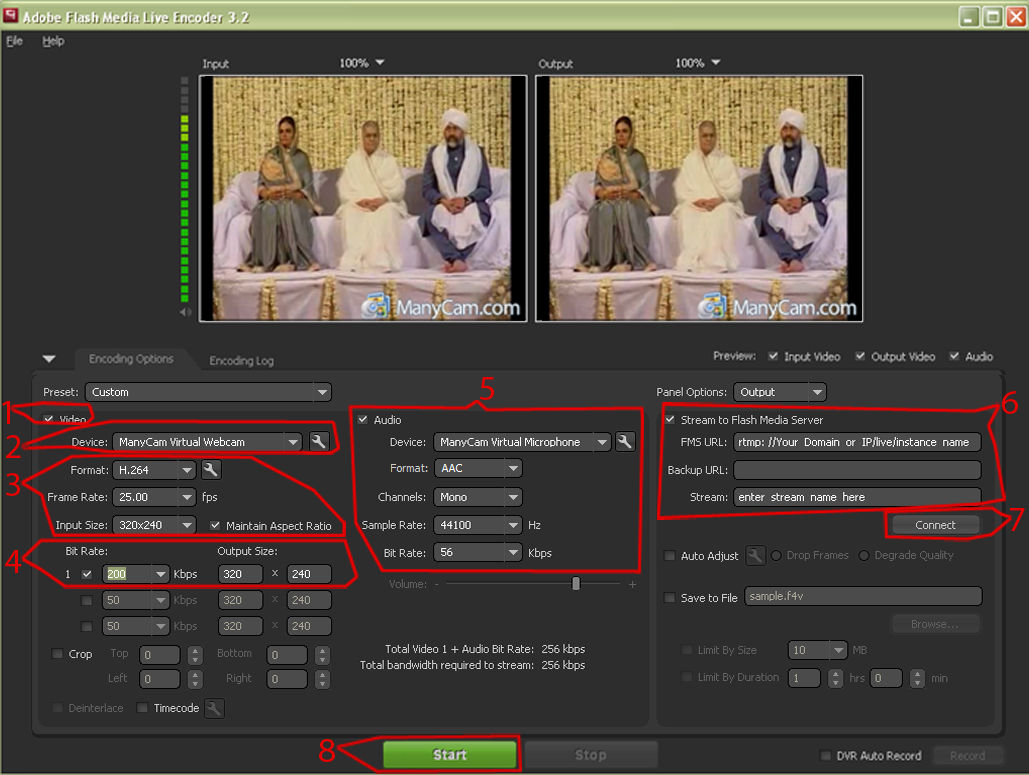
Please note the above screen shot is for default single stream. Please check with technical team before changing anythings.
| |
Requirements for Multiple Bitrate dynamic streaming: - |
| |
Open another Flash Media Live Encoder Window from Start Menu if you do not have multiple pc at the location. But It is highly recommended that you should use multiple PC/Laptop for multiple video Encoding. Rest every things will be same as shown in above screenshot but will change the bitrate and FMS URL and Stream Name. Please check in below screenshot and look at points number # 4 & #6 and see the difference in Bitrate and FMS URL and Stream URL. |
| |
Second Stream - Medium quality 350 kbps (Audio + Video 406 Kbps) |
| |
 |
| |
|
| |
Same if you want to published third stream for high quality using the Third PC/Laptop, then check the below screenshot image and change the Bitrate, FMS URL and Stream name. Please check in below screenshot and look at points number # 4 & #6 and see the difference in Bitrate and FMS URL and Stream URL. |
| |
Third Stream - High quality 500 kbps (Audio + video 556 Kbps) |
| |
 |
| |
If you face any issue please contact immediately to technical team or send email to [email protected]. |
- Video Signal Issues
- After successful installation of Adobe Flash Media Live Encoder and
MainConcept AAC Audio Encoder Plugin ; restart the computer.
- If the encoder does not detect the video from Firewire port, check the firewire cable. Verify by using another firewire cable.
- Ensure Video format is selected as H.264
- Audio Signal Issues
- While using Video input as "Firewire", select the audio format
as "Firewire" as well. Ideally video & audio input should be from
same source.
- Ensure Audio format is selected as AAC. Video format is selected as H.264
- In case of "No" or "Broken" sound, the problem could be from
mixer. Verify by providing input to the encoder from a MP3 player.
- In case of sound volume is being reported as low from the
stream, check the sound input volume from mixer.